Snapshot Migration Using Spark on Kubernetes
Read and follow me on Medium (opens in a new tab)

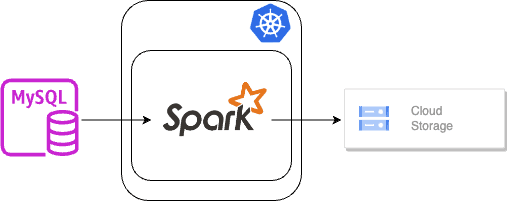
Snapshot migration is a technique used to transfer data from one system to another by capturing a point-in-time snapshot of the source data. This method is particularly useful when dealing with large datasets, ensuring data consistency and minimizing downtime during the migration process. Leveraging Spark on Kubernetes adds scalability and flexibility to the migration pipeline, making it an ideal choice for modern data engineering workflows.
Spark Job on Kubernetes
Submitting Spark jobs on Kubernetes offers numerous benefits.
- Firstly, it provides an environment-agnostic platform that allows your Spark applications to run on any infrastructure that supports Kubernetes. This eliminates the need for different application cluster management systems, thereby simplifying your operations.
- Secondly, Kubernetes provides superior resource management, ensuring that your applications efficiently use available resources.
- Lastly, it simplifies application deployment and scaling, enhancing productivity and efficiency.
Spark Management using YARN vs. Kubernetes

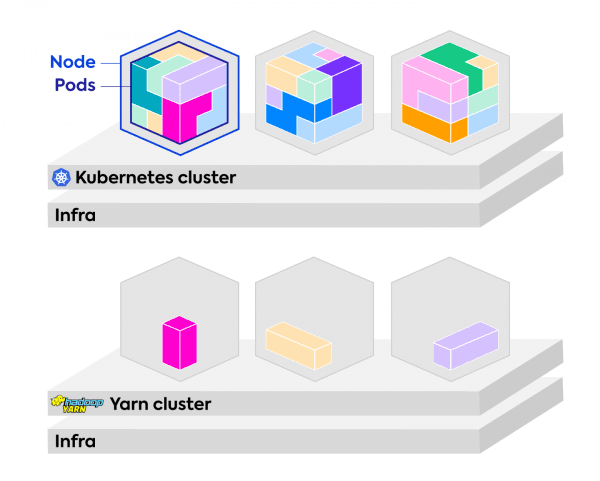
Source: https://spot.io/blog/kubernetes-vs-yarn-for-scheduling-apache-spark/
Traditionally, YARN (Yet Another Resource Negotiator) was the de facto standard for Spark job management. However, Kubernetes offers certain advantages over YARN. YARN lacks isolation between different jobs, leading to potential conflicts, while Kubernetes uses Docker containers to provide isolation, ensuring that jobs do not interfere with each other. Furthermore, Kubernetes is more flexible and portable as it is not tied to the Hadoop ecosystem, unlike YARN.
Spark Operator on Kubernetes
The Spark Operator for Kubernetes (opens in a new tab) is an open-source project that enables the deployment and management of Spark applications on Kubernetes. It extends the Kubernetes API to support Spark application lifecycle management, including submission, execution, and termination of Spark applications.

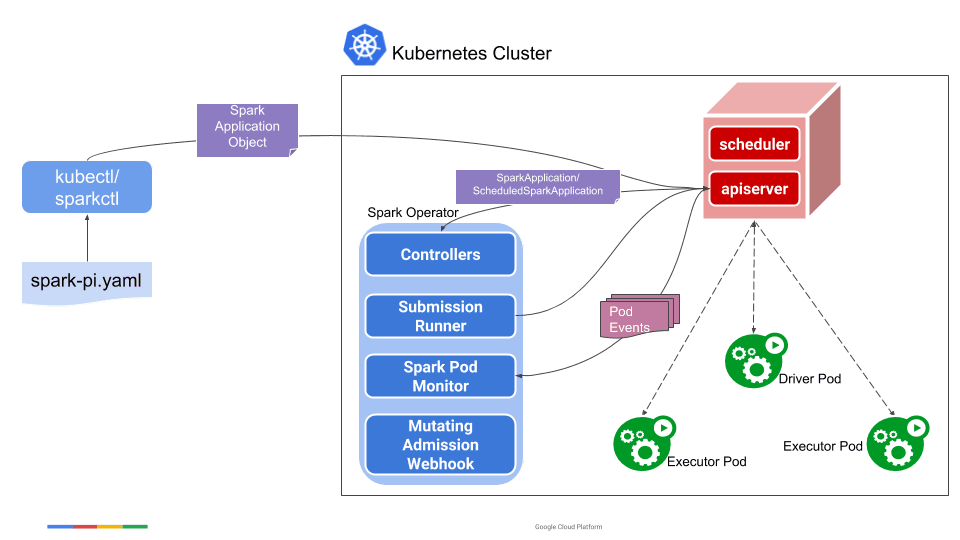
Source: https://github.com/GoogleCloudPlatform/spark-on-k8s-operator/blob/master/docs/architecture-diagram.png
Specifically, a user uses the
sparkctl(orkubectl) to create aSparkApplicationobject. TheSparkApplicationcontroller receives the object through a watcher from the API server, creates a submission carrying thespark-submitarguments, and sends the submission to the submission runner. The submission runner submits the application to run and creates the driver pod of the application. Upon starting, the driver pod creates the executor pods. While the application is running, the Spark pod monitor watches the pods of the application and sends status updates of the pods back to the controller, which then updates the status of the application accordingly — Spark Operator Architecture (opens in a new tab).
Installing the Spark Operator using Helm
- Add the Spark Operator chart repository to your Helm setup.
helm repo add spark-operator https://googlecloudplatform.github.io/spark-on-k8s-operatorkubectl create ns spark-jobs- Finally, install the Spark Operator using the Helm install command.
helm install spark spark-operator/spark-operator --namespace spark-operator --set sparkJobNamespace=spark-jobs --set webhook.enable=true+)--namespace spark-operator : the Helm chart will create a namespace spark-operator if it doesn't exist, and Helm will set up RBAC for the operator to run in the namespace. In addition, the chart will create a Deployment in the namespace spark-operator.
+)--set sparkJobNamespace=spark-jobs: the Helm chart will create the necessary service account (opens in a new tab) and RBAC in the spark-jobs namespace. The Spark Operator uses the Spark Job Namespace to identify and filter relevant events for the SparkApplication CRD. If you don’t specify a namespace, the Spark Operator will see SparkApplication events for all namespaces and will deploy them to the namespace requested in the create call. In this case, I want to assign a specific namespace (spark-jobs) to manage all my SparkApplication.
+) --set webhook.enable=true: the chart by default does not enable Mutating Admission Webhook (opens in a new tab) for Spark pod customization. When enabled, a webhook service and a secret storing the x509 certificate called spark-webhook-certs are created for that purpose.
Notes: (opens in a new tab) Add this flag --set webhook.port=443 if you are deploying the operator on a GKE cluster with the Private cluster (opens in a new tab) setting enabled, and you wish to deploy the cluster with the Mutating Admission Webhook (opens in a new tab), then make sure to change the webhookPort to 443.
If the installation is completed, you will see the following results:
-> kubectl get all -n spark-operator                                            3

NAME                                          READY   STATUS      RESTARTS   AGE
pod/spark-spark-operator-5c4684665b-75rmj     1/1     Running     0          84s
pod/spark-spark-operator-webhook-init-xr5cb   0/1     Completed   0          88s

NAME                                   TYPE        CLUSTER-IP    EXTERNAL-IP   PORT(S)   AGE
service/spark-spark-operator-webhook   ClusterIP   10.72.14.70   <none>        443/TCP   85s

NAME                                   READY   UP-TO-DATE   AVAILABLE   AGE
deployment.apps/spark-spark-operator   1/1     1            1           85s

NAME                                              DESIRED   CURRENT   READY   AGE
replicaset.apps/spark-spark-operator-5c4684665b   1         1         1       85s

NAME                                          COMPLETIONS   DURATION   AGE
job.batch/spark-spark-operator-webhook-init   1/1           3s         85s
Submitting Spark Job on Kubernetes
Running the Examples Job
To run the Spark Pi example (opens in a new tab), check this file and run the following command below. Because I installed the operator using the Helm chart and overrode sparkJobNamespace=spark-jobs, the service account name ends with -spark and starts with the Helm release name.
You can check the service account by using this command:
-> kubectl get serviceAccounts -n spark-jobs
NAME                              SECRETS   AGE
default                           0         1d
spark-spark                       0         1d
apiVersion: "sparkoperator.k8s.io/v1beta2"
kind: SparkApplication
metadata:
name: spark-pi
namespace: spark-jobs # sparkJobNamespace
spec:
type: Scala
mode: cluster
image: "gcr.io/spark-operator/spark:v3.1.1"
imagePullPolicy: Always
mainClass: org.apache.spark.examples.SparkPi
mainApplicationFile: "local:///opt/spark/examples/jars/spark-examples_2.12-3.1.1.jar"
sparkVersion: "3.1.1"
restartPolicy:
type: Never
volumes:
- name: "test-volume"
hostPath:
path: "/tmp"
type: Directory
driver:
cores: 1
coreLimit: "1200m"
memory: "512m"
labels:
version: 3.1.1
serviceAccount: spark-spark # kubectl get serviceAccounts -n spark-jobs
volumeMounts:
- name: "test-volume"
mountPath: "/tmp"
executor:
cores: 1
instances: 1
memory: "512m"
labels:
version: 3.1.1
volumeMounts:
- name: "test-volume"
mountPath: "/tmp"kubectl apply -f examples/spark-pi.yamlAfter you run this command, you can see your job being run in the spark-jobs namespace:
-> kubectl get pods -n spark-jobs

NAME                                        READY   STATUS      RESTARTS   AGE

spark-pi-driver                             1/1     Running     0          18s
spark-pi-84d58b8b1e242241-exec-1            1/1     Running     0          6s
Building a docker container with the PySpark file for the** Snapshot Migration Job
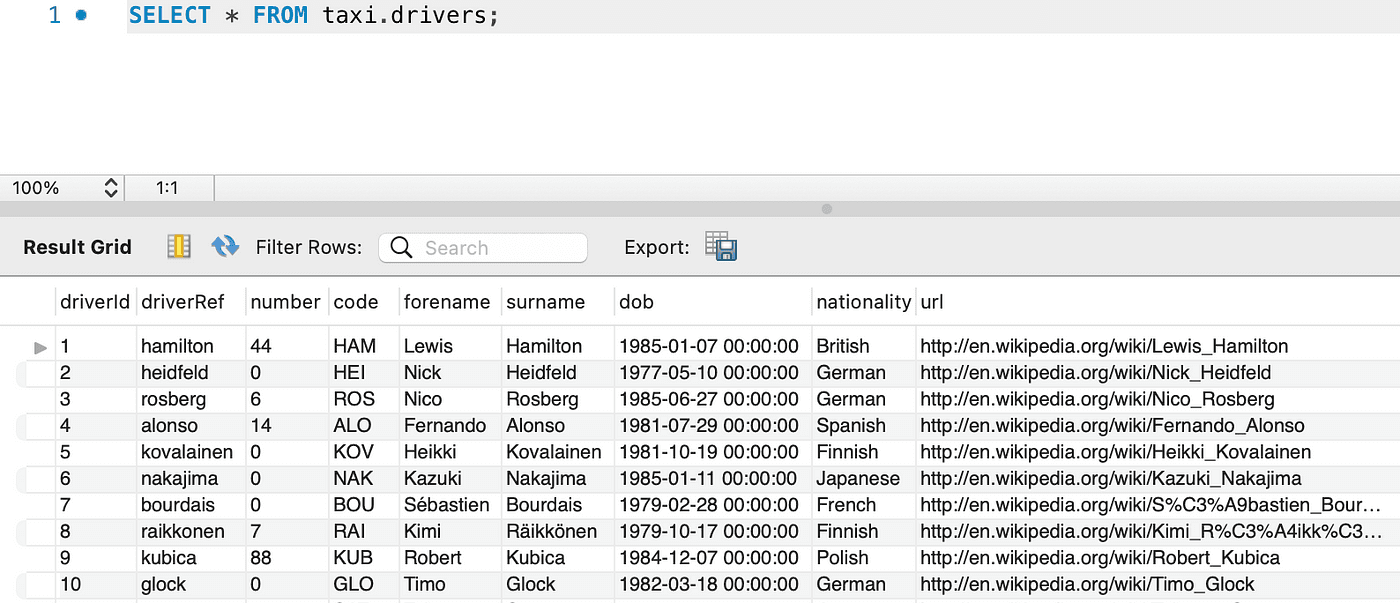
Check data in MySQL:

Now we will go to the section on how to submit the PySpark file that we define ourselves, the initial step is to containerize our Spark application and upload it to a container registry, such as GCR.
Through extracting data from MySQL and subsequently storing it in Parquet format on Google Cloud Storage (GCS), my objective is to highlight the inclusion of extra configurations and dependencies in the process:
1. Create an image with the PySpark file
.
├── Dockerfile
├── conf
│   ├── core-site.xml
│   └── spark-env.sh
├── execute_spark_job.yaml
├── jars
│   ├── gcs-connector-hadoop3-2.2.17-shaded.jar
│   └── mysql-connector-java-8.0.28.jar
└── spark-files
    └── spark_job.py
# Dockerfile
FROM gcr.io/spark-operator/spark-py:v3.1.1-hadoop3
USER root:root
RUN mkdir -p /app
RUN mkdir -p /opt/hadoop/conf
RUN mkdir -p /opt/spark/conf
COPY ./spark-files /app
COPY ./jars/mysql-connector-java-8.0.28.jar /opt/spark/jars
COPY ./jars/gcs-connector-hadoop3-2.2.17-shaded.jar /opt/spark/jars
COPY ./conf/core-site.xml /opt/hadoop/conf
COPY ./conf/spark-env.sh $SPARK_HOME/conf
WORKDIR /app
ENTRYPOINT [ "/opt/entrypoint.sh" ]# core-site.xml
<?xml version="1.0" ?>
<?xml-stylesheet type="text/xsl" href="configuration.xsl"?>
<configuration>
<property>
<name>fs.gs.impl</name>
<value>com.google.cloud.hadoop.fs.gcs.GoogleHadoopFileSystem</value>
</property>
<property>
<name>fs.AbstractFileSystem.gs.impl</name>
<value>com.google.cloud.hadoop.fs.gcs.GoogleHadoopFS</value>
</property>
<property>
<name>fs.gs.project.id</name>
<value>gcp-project-demo</value>
</property>
</configuration># spark-env.sh
export HADOOP_CONF_DIR="/opt/hadoop/conf"
export HADOOP_OPTS="$HADOOP_OPTS -Dgs.project.id=$GS_PROJECT_ID"# spark_job.py
from pyspark.sql import SparkSession
from pyspark import SparkConf
if __name__ == '__main__':
spark = SparkSession \
.builder \
.appName("migration_snapshot") \
.config("spark.sql.session.timeZone", "UTC") \
.config("spark.sql.legacy.parquet.int96RebaseModeInWrite", "CORRECTED") \
.config("spark.sql.legacy.parquet.datetimeRebaseModeInWrite", "CORRECTED") \
.getOrCreate()
print(SparkConf().getAll())
spark.sparkContext.setLogLevel('INFO')
load_df = spark.read \
.format("jdbc") \
.option("driver", "com.mysql.cj.jdbc.Driver") \
.option("url", "jdbc:mysql://XX.XX.XX.XX:3306/taxi?serverTimezone=UTC") \
.option("user", "XXX") \
.option("password", "XXX") \
.option("dbtable", "drivers") \
.option("pushDownPredicate", "false") \
.option("fetchsize", f"1000") \
.load()
output_path = f"gs://datalake/snapshot/taxi/drivers"
load_df.repartition(2).write.format("parquet").mode("overwrite").save(output_path)
spark.stop()And gcs-connector-hadoop3–2.2.17-shaded.jar (opens in a new tab), mysql-connector-java-8.0.28.jar (opens in a new tab)
Then, run the following commands to build and push the image on GCR:
docker build -f Dockerfile --tag pyspark_migration_snapshot .
docker tag pyspark_migration_snapshot:latest asia.gcr.io/gcp-project-demo/pyspark_migration_snapshot:1.0.0
docker push asia.gcr.io/gcp-project-demo/pyspark_migration_snapshot:1.0.0
2. Create a service account on GCP to use for reading data from GCS
Create a service account and provide it with GCP access that includes Storage Admin permission. Then, generate a JSON key named “k8s-services-spark-jobs-sc.json” from this service account.
Next, create Kubernetes secret from JSON key(k8s-services-spark-jobs-sc.json) with this command:
kubectl create secret generic sc-key --from-file=key.json=/<path>/<to>/<sc>/k8s-services-spark-jobs-sc.json -n spark-jobs3. Create a YAML file for submitting the Spark job:
# execute_spark_job.yaml

apiVersion: "sparkoperator.k8s.io/v1beta2"
kind: SparkApplication
metadata:
  name: pyspark-job-migration-snapshot
  namespace: spark-jobs
spec:
  type: Python
  mode: cluster
  image: asia.gcr.io/gcp-project-demo/pyspark_migration_snapshot:1.0.0
  imagePullPolicy: Always
  mainApplicationFile: 'local:///app/spark_job.py'
  sparkVersion: '3.1.1'
  restartPolicy:
    type: Never
  hadoopConf:
    "fs.gs.project.id": "gcp-project-demo"
    "fs.gs.system.bucket": "tmpdata"
    "google.cloud.auth.service.account.enable": "true"
    "google.cloud.auth.service.account.json.keyfile": "/mnt/secrets/key.json"
  sparkConf:
    spark.eventLog.enabled: "true"
    spark.eventLog.dir: "gs://gcp-project-demo/spark-history/"
  driver:
    coreRequest: 250m
    coreLimit: '1200m'
    memory: '512m'
    secrets:
    - name: 'sc-key'
      path: '/mnt/secrets'
      secretType: GCPServiceAccount
    serviceAccount: spark-spark
    labels:
      version: 3.1.1
    envVars:
      GCS_PROJECT_ID: gcp-project-demo
  executor:
    coreRequest: 250m
    instances: 2
    memory: '512m'
    secrets:
    - name: 'sc-key'
      path: '/mnt/secrets'
      secretType: GCPServiceAccount
    labels:
      version: 3.1.1
    envVars:
      GCS_PROJECT_ID: gcp-project-demo
kubectl apply -f execute_spark_job.yamlAfter you run this command, you can see your job being run in the spark-jobs namespace.
-> kubectl get pods -n spark-jobs

NAME                                                   READY   STATUS    RESTARTS   AGE
pod/migrationsnapshot-4dace28bb79b6953-exec-1          1/1     Running   0          33s
pod/migrationsnapshot-4dace28bb79b6953-exec-2          1/1     Running   0          33s
pod/pyspark-job-migration-snapshot-driver              1/1     Running   0          59s
You can check the log with the following command:
kubectl logs pyspark-job-migration-snapshot-driver -n spark-jobs -fOutput in GCS:

Spark History UI
The Spark History Server provides a web UI for completed and active Spark applications. To install it on Kubernetes, you need to create a Spark history server deployment and service in your Kubernetes cluster. The deployment should include the Spark history server Docker image and define a volume for event logs. The service exposes the Spark history server UI to users.
helm repo add stable https://charts.helm.sh/stable# spark-history-server/values.yaml
gcs:
enableGCS: true
secret: sc-key
key: key.json
logDirectory: gs://gcp-project-demo/spark-history/
pvc:
enablePVC: false
existingClaimName: nfs-pvc
eventsDir: “/”
nfs:
enableExampleNFS: false
pvName: nfs-pv
pvcName: nfs-pvchelm install -f spark-history-server/values.yaml stable/spark-history-server --namespace spark-jobs --generate-nameYou can check the deployment by using this command:
-> kubectl get deployment -n spark-jobs
NAME                              READY   UP-TO-DATE   AVAILABLE   AGE
spark-history-server-1695617960   1/1     1            1           1d
Use Port Forwarding to Spark UI:
kubectl port-forward deployments/spark-history-server-1695617960 18080:18080 -n spark-jobsGo to http://localhost:18080/ (opens in a new tab)

You can find all the code and files from this demo in my GitHub repository:
github.com/hungngph/snapshot_migration_spark_kubernetes (opens in a new tab)
Conclusion
In conclusion, snapshot migration using Spark on Kubernetes is a powerful approach for efficiently transferring large volumes of data while maintaining data consistency and minimizing downtime. By leveraging the scalability and flexibility of Spark on Kubernetes, organizations can streamline their data migration processes and unlock the full potential of their data assets.